دليل كوش سمارت

KUSH SMART guide

كل ما تحتاج معرفته لإعداد منزلك الذكي — خطوة بخطوة، ودون أي تعقيد.Everything you need to set up your smart home — step by step, with nothing complicated.

1 تثبيت التطبيق وإنشاء حسابInstall the app & create an account

  1. حمّل تطبيق كوش سمارت من Google Play (أندرويد) أو App Store (آيفون).
  2. افتح التطبيق واضغط إنشاء حساب.
  3. أدخل بريدك الإلكتروني واختر كلمة مرور، وأكّد الحساب عبر البريد.
  4. سجّل الدخول — وبذلك يصبح حسابك جاهزًا.
  1. Download the KUSH SMART app from Google Play (Android) or the App Store (iPhone).
  2. Open the app and tap Create account.
  3. Enter your email, pick a password, and confirm from the email you receive.
  4. Sign in — your account is ready.
🔒
ترتبط جميع أجهزتك بحسابك وحده. لا يمكن لأحد غيرك رؤيتها أو التحكّم فيها.
All your devices are tied to your account alone. No one else can see or control them.
🎨
في أول تشغيل يسألك التطبيق عن اللغة (العربية / English) والمظهر (فاتح / داكن / حسب النظام). تقدر تغيّرهم في أي وقت — راجع اللغة والمظهر. لو نسيت كلمة المرور، اضغط «نسيت كلمة المرور» في شاشة الدخول واتبع الرابط في بريدك.
On first launch the app asks for your language (العربية / English) and theme (light / dark / follow system). You can change these any time — see Language & appearance. Forgot your password? Tap “Forgot password” on the sign-in screen and follow the link in your email.

2 إضافة أول جهاز (التوصيل بالواي فاي)Add your first device (Wi-Fi setup)

تُنشئ الوحدة في أول مرة شبكة واي فاي خاصة بها للإعداد، ويرشدك التطبيق خطوة بخطوة.

On first power-up the unit creates its own Wi-Fi network for setup, and the app walks you through it.

  1. تأكّد من أن الوحدة تعمل، ومن توفّر كلمة مرور واي فاي المنزل لديك.
  2. من الشاشة الرئيسية اضغط ➕ إضافة جهاز.
  3. سيعثر التطبيق على الوحدة الجديدة — اخترها.
  4. اختر شبكة الواي فاي (2.4 جيجا) وأدخل كلمة المرور.
  5. اضغط حفظ / اتصال — وستُعيد الوحدة التشغيل وتتّصل.
  6. خلال ثوانٍ ستظهر الوحدة وجميع مفاتيحها في قائمة أجهزتك. ✅
  1. Make sure the unit is powered, and have your home Wi-Fi password ready.
  2. On the home screen, tap ➕ Add device.
  3. The app finds the new unit — select it.
  4. Pick your Wi-Fi network (2.4GHz) and enter the password.
  5. Tap Save / Connect — the unit restarts and connects.
  6. Within seconds the unit and all its switches appear in your device list. ✅
📶
تعمل الأجهزة الذكية على واي فاي 2.4 جيجا (وليس 5 جيجا). إذا كان راوترك يدمج الشبكتين، يُفضَّل فصلهما أثناء الإعداد.
Smart devices use 2.4GHz Wi-Fi (not 5GHz). If your router combines both bands, it helps to split them during setup.

3 الإعدادات العامةGeneral settings

من صفحة الإعدادات / Configuration الخاصة بالوحدة، يمكنك ضبط طريقة عمل المفاتيح وفقًا لتركيبتك الكهربائية. افتح تفاصيل الوحدة ← الإعدادات العامة.

From the unit's Settings / Configuration page you can tune how the switches behave for your wiring. Open the unit's details → General settings.

الإعدادالوظيفة
وضع المفتاحعادي / مفتاح ثلاثي (Three-way) / ضغط (Push)
توصيل المفتاحPull-up أو Pull-down حسب التوصيلة
الريليهActive-High أو Active-Low
اسم نقطة الواي فاي (AP)اسم الشبكة التي تُنشئها الوحدة أثناء الإعداد
زر الإعدادتوصيل زر الإعداد على الوحدة
SettingWhat it does
Switch modeNormal / three-way / push button
Switch wiringPull-up or pull-down, to match your wiring
RelayActive-high or active-low
Access-point name (AP)The network name the unit creates during setup
Setup buttonWiring for the unit's setup button
⚠️
إذا كانت المفاتيح الخارجية لا تعمل بشكل صحيح، جرّب تغيير وضع المفتاح أو نوع التوصيل (Pull-up/Pull-down). وإذا كان الريليه يعمل بشكل معكوس، غيّر Active-High/Low.
If external switches don't behave right, try changing the switch mode or the wiring type (pull-up / pull-down). If a relay works inverted, flip Active-high / low.
💾
يُحفظ أي إعداد تغيّره على الوحدة نفسها، فيظلّ محفوظًا حتى بعد فصل الكهرباء.
Any setting you change is saved on the unit itself, so it survives a power cut.
شرح مفصّل لصفحة إعداد البوردةThe full board-setup walkthrough — القوالب الجاهزة، القنوات، منافذ GPIO، وكل خيار خطوة بخطوة.— ready templates, channels, GPIO pins, and every option step by step.
دليل إعداد البوردةBoard setup guide

4 التحكّم في الأجهزةControlling devices

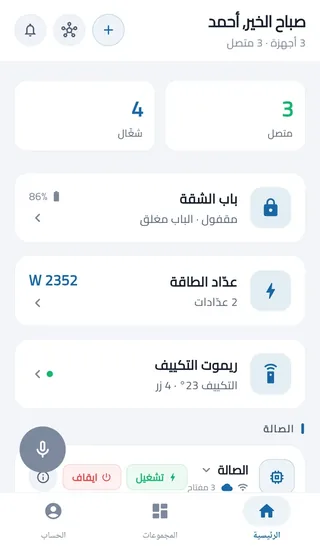
KUSH SMART control home screen

الشاشة الرئيسية — جميع أجهزتك وحالتها وأزرار التحكّم.Home screen — all your devices, their status and controls.

الإجراءالطريقة
تشغيل / إطفاءاضغط على زر الجهاز
خفوت الإضاءة (Dimmer)حرّك الشريط لأعلى/لأسفل
سرعة المروحةحرّك شريط السرعة
الألوان (RGB)اختر اللون من دائرة الألوان
الستائر / الشترأزرار فتح / غلق / إيقاف
فتح صفحة تفاصيل القناةاضغط ضغطة واحدة على أي قناة (حسّاس / إضاءة / RGB / مروحة)
خيارات الجهاز الكاملةاضغط مطوّلًا على الجهاز
ActionHow
On / offTap the device button
Dim a lightDrag the slider up / down
Fan speedDrag the speed slider
Colour (RGB)Pick a colour from the colour wheel
Curtains / shutterOpen / close / stop buttons
Open the channel detail pageSingle-tap any channel (sensor / light / RGB / fan)
Full device optionsLong-press the device

4b صفحة تفاصيل القناةChannel detail page

أي قناة في التطبيق — مفتاح، إضاءة خافتة، RGB، مروحة، ستارة، أو حسّاس — تفتح صفحة تفاصيل خاصّة بها عند الضغط عليها. من هذه الصفحة ترى الحالة الحيّة وتتحكّم وتضبط الإعدادات في مكان واحد.

Any channel in the app — a switch, dimmer, RGB, fan, curtain or sensor — opens its own detail page when you tap it. There you see the live status, control it, and adjust its settings, all in one place.

  1. اضغط على القناة لفتح صفحتها.
  2. في الأعلى تظهر الحالة الحيّة (تشغيل/إطفاء، نسبة الخفوت، اللون، درجة الحرارة والرطوبة…).
  3. بالأسفل أدوات التحكّم، والأتمتة الخاصّة بهذه القناة، والإعدادات (إعادة التسمية).
  1. Tap the channel to open its page.
  2. At the top you see the live status (on/off, brightness, colour, temperature and humidity…).
  3. Below are the controls, the channel's own automation, and settings (rename).
🎛️
الأتمتة انتقلت إلى داخل صفحة القناة نفسها — افتح القناة أو الحسّاس واضغط «الأتمتة» لربط شرطٍ بنتيجة.
Automation now lives inside the channel page itself — open the channel or sensor and tap Automation to link a condition to an action.

5 تسمية الأجهزةNaming devices

  1. اضغط مطوّلًا على الجهاز ← إعادة تسمية.
  2. أدخل اسمًا واضحًا مثل «إضاءة الصالة».
  3. احفظ.
  1. Long-press the device → Rename.
  2. Enter a clear name like “Living-room light”.
  3. Save.
💡
يُحفظ الاسم على الجهاز نفسه، فيظهر بالاسم ذاته في كل مكان داخل التطبيق.
The name is stored on the device itself, so it shows the same everywhere in the app.

6 المجموعاتGroups

اجمع عدّة أجهزة في مجموعة وتحكّم فيها جميعًا بضغطة واحدة (مثلًا «إضاءة الطابق الأول»).

Put several devices in a group and control them all with one tap (e.g. “First-floor lights”).

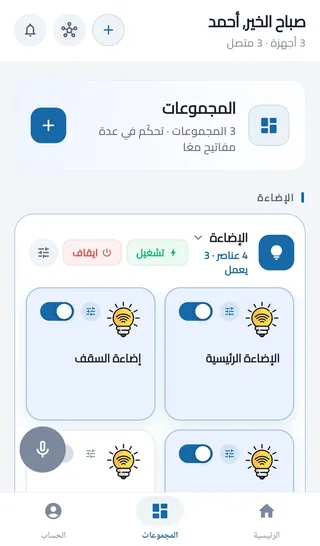
Groups page

صفحة المجموعاتGroups page

Create / edit a group

إنشاء وتعديل مجموعةCreate & edit a group

  1. افتح صفحة المجموعات➕ مجموعة جديدة.
  2. أدخل اسم المجموعة واختر الأجهزة التي تتضمّنها.
  3. احفظ — والآن يمكنك تشغيل/إطفاء المجموعة بأكملها مرة واحدة.
  1. Open the Groups page → ➕ New group.
  2. Enter a group name and pick the devices it includes.
  3. Save — now you can switch the whole group on or off at once.

6b التحكّم الصوتيVoice control

تحكّم في أجهزتك بصوتك من داخل التطبيق مباشرةً، بالعربية أو الإنجليزية.

Control your devices with your voice, right inside the app — in Arabic or English.

  1. اضغط زر الميكروفون 🎤 في الشاشة الرئيسية.
  2. امنح الإذن باستخدام الميكروفون عند طلبه لأول مرة.
  3. انطق أمرًا واضحًا مثل: «شغّل إضاءة الصالة» أو «اطفي المروحة».
  1. Tap the microphone 🎤 button on the home screen.
  2. Grant microphone permission the first time it asks.
  3. Say a clear command like “Turn on the living-room light” or “Turn off the fan”.
🗣️
استخدم نفس اسم الجهاز الظاهر في التطبيق ليتعرّف عليه بدقّة. الأوامر تُنفَّذ فورًا عبر شبكتك المحليّة.
Use the same device name shown in the app so it's recognised accurately. Commands run instantly over your local network.

7 المؤقّتات والإطفاء التلقائيTimers & auto-off

عدّاد تنازلي (مرة واحدة)

One-off countdown

  1. افتح تفاصيل الجهاز ← مؤقّت.
  2. اختر المدة (مثلًا يُطفأ بعد 30 دقيقة).
  3. أكّد — ويظهر المؤقّت الفعّال داخل صفحة الجهاز.
  1. Open the device details → Timer.
  2. Pick a duration (e.g. turn off after 30 minutes).
  3. Confirm — the running timer shows on the device page.

إطفاء تلقائي دائم

Permanent auto-off

«في كل مرة يعمل، يُطفأ بعد عدد من الثواني» — مفيدة لسخّان المياه أو إضاءة الحمّام.

“Every time it turns on, turn it off after N seconds” — handy for a water heater or bathroom light.

  1. افتح تفاصيل الجهاز ← إطفاء تلقائي.
  2. حدّد المدة بالثواني واحفظ — وسيعمل في كل مرة يُشغَّل فيها الجهاز.
  1. Open the device details → Auto-off.
  2. Set the time in seconds and save — it applies every time the device turns on.

8 الجدولة الزمنيةScheduling

اجعل الأجهزة تعمل/تتوقّف في مواعيد ثابتة (مثلًا تُضاء الإضاءة 6 مساءً وتُطفأ 11).

Have devices switch on or off at fixed times (e.g. lights on at 6pm, off at 11).

  1. افتح صفحة الجدولة➕ موعد جديد.
  2. اختر الجهاز والوقت والأيام.
  3. اختر الإجراء (تشغيل / إطفاء) واحفظ.
  1. Open the Schedule page → ➕ New schedule.
  2. Pick the device, time and days.
  3. Choose the action (on / off) and save.

L القفل الذكيSmart lock

يظهر القفل الذكي في قائمة أجهزتك ككيان خاص. اضغط عليه لفتح صفحة التحكّم.

The smart lock appears in your device list as its own entity. Tap it to open the control page.

  1. القفل / الفتح: اضغط الزر الكبير لقفل الباب أو فتحه، وتظهر الحالة الحيّة (مقفول / مفتوح) وحالة الباب والبطارية.
  2. إدارة الوصول: من بيانات الدخول تضيف أو تحذف بطاقات RFID، أو بصمات، أو أرقام PIN لفتح القفل.
  3. الإشعارات: يصلك تنبيه عند فتح الباب أو محاولة عبث — حتى والتطبيق مغلق.
  1. Lock / unlock: tap the big button to lock or unlock the door; the live state (locked / unlocked), door state and battery are shown.
  2. Access management: under Credentials, add or remove RFID cards, fingerprints or PINs that open the lock.
  3. Alerts: you're notified when the door opens or someone tampers — even when the app is closed.
🔋
تظهر نسبة بطارية القفل في التطبيق وفي Home Assistant، فتعرف مبكرًا متى تحتاج للشحن أو التغيير.
The lock's battery level shows in the app and in Home Assistant, so you know early when it needs charging or replacing.

P عدّاد الطاقةPower meter

وحدة قياس استهلاك الكهرباء تظهر ككيان خاص يعرض القراءات لحظيًا لكل خط.

The energy-monitoring unit appears as its own entity with live readings per line.

  1. اضغط على عدّاد الطاقة لفتح صفحته.
  2. ترى الجهد (V)، التيار (A)، القدرة (W)، القدرة الظاهرية (VA)، معامل القدرة، والطاقة المستهلكة (kWh) — مع رسم بياني قصير للحِمل.
  3. يمكنك تسمية كل خط، وإضافة عدّة عدّادات، وتصفير عدّاد الطاقة عند الحاجة.
  1. Tap the power meter to open its page.
  2. You see voltage (V), current (A), power (W), apparent power (VA), power factor and energy used (kWh) — with a short load chart.
  3. You can name each line, add several meters, and reset the energy counter when needed.
كل هذه القراءات تظهر أيضًا في Home Assistant كحسّاسات، فتبني لوحات ورسومًا لاستهلاكك على مدار الوقت.
All of these readings also appear in Home Assistant as sensors, so you can build dashboards and charts of your usage over time.

9 الأتمتة (عند حدوث شيء، نفّذ إجراءً)Automations (when X happens, do Y)

اربط الحسّاسات بالإجراءات تلقائيًا — دون لمس هاتفك. الأتمتة الآن جزء من صفحة تفاصيل القناة.

Link sensors to actions automatically — without touching your phone. Automation is now part of the channel detail page.

  1. اضغط على القناة أو الحسّاس لفتح صفحته ← الأتمتة➕ أتمتة جديدة.
  2. اختر الشرط (مثلًا: الحرارة أكبر من 30، أو فتح حسّاس الباب، أو معاد الشروق/الغروب).
  3. اختر النتيجة: تشغيل/إطفاء جهاز، أو إرسال أمر ريموت (IR/433MHz) لزرّ اتعلّم من قبل، و/أو إرسال إشعار.
  4. تقدر كمان تضيف شروطًا إضافية («وكمان») واستثناءات («إلا إذا»)، وتحصر القاعدة في نافذة زمنية معيّنة (مثلًا بالليل بس).
  5. احفظ — وتعمل الأتمتة تلقائيًا حتى والتطبيق مقفول (تشتغل على السيرفر).
  1. Tap the channel or sensor to open its page → Automation➕ New automation.
  2. Pick the condition (e.g. temperature above 30, the door sensor opens, or sunrise/sunset).
  3. Pick the result: turn a device on/off, send a stored remote command (IR/433MHz) to a learned button, and/or send an alert.
  4. You can also add extra conditions (“and also”) and exceptions (“unless”), and limit the rule to a time window (e.g. nighttime only).
  5. Save — the automation runs on its own, even with the app closed (it runs on the server).
🤖
أمثلة: «إذا ارتفعت الحرارة شغّل المروحة»، «إذا فُتح الباب أرسل لي إشعارًا وشغّل الإضاءة»، «عند الغروب شغّل زرّ التكييف المتعلَّم في ريموت الصالة».
Examples: “If it gets hot, turn on the fan.” “If the door opens, alert me and turn on the light.” “At sunset, fire the learned A/C-power button on the living-room remote.”

9b الوصول والمغادرة تلقائيًا (الجيوفنسنج)Automatic arrive / leave scenes (Geofencing)

اجعل أجهزتك تستجيب لمكانك أنت — تشتغل تلقائيًا لما توصل البيت، وتُطفأ لما تخرج، من غير ما تلمس التطبيق. على أندرويد فقط، ومطفّاة افتراضيًا.

Have your devices react to where YOU are — turn on the moment you arrive home, off the moment you leave, without touching the app. Android only, off by default.

  1. افتح تبويب حسابيالجيوفنسنج.
  2. اضغط «استخدم موقعي الحالي» وأنت في البيت لتحديد إحداثياته — أفضل نتيجة في الهواء الطلق أو قرب شبّاك.
  3. اضبط نطاق الاكتشاف (من 50 إلى 500 متر).
  4. تحت «لما أوصل» و«لما أخرج»، حدّد لكل مفتاح: تجاهل / شغّل / أطفي.
  5. فعّل المفتاح العلوي — سيطلب التطبيق إذن الموقع مرّتين: أثناء الاستخدام، ثم «السماح طول الوقت» (لازم عشان تشتغل والتطبيق مقفول).
  1. Open the Account tab → Geofencing.
  2. Tap “Use my current location” while you're home to set its coordinates — works best outdoors or near a window.
  3. Set the detection radius (50–500 metres).
  4. Under “When I arrive” and “When I leave”, pick per switch: Ignore / On / Off.
  5. Turn on the top switch — the app asks for location permission twice: while using the app, then “Allow all the time” (needed so it still works with the app closed).
📍
إزّاي بيعرف إنّك «وصلت» أو «خرجت»؟ التطبيق بيستخدم خدمة الـ Geofencing المدمجة في أندرويد نفسه — بتراقب دخولك وخروجك من دائرة حوالين إحداثيات بيتك في الخلفية، من غير استهلاك بطارية زي تتبّع GPS المستمر. عند الخروج، بينتظر حوالي دقيقة قبل ما يعتبرها مغادرة فعلية، عشان لحظة إشارة ضعيفة عند حافة الدائرة متتفسّرش غلط إنّك خرجت ورجعت فورًا.
How does it know you “arrived” or “left”? The app uses Android's own built-in Geofencing service — it watches for your phone entering/exiting a circle around your home coordinates in the background, without the battery cost of continuous GPS tracking. On exit it waits about a minute before treating it as a real departure, so one weak-signal moment right at the edge of the circle doesn't get misread as leaving and instantly coming back.
🔋
الميزة تحتاج إذن «السماح طول الوقت» للموقع، وده بيستهلك بطارية أكتر شوية — تقدر توقفها في أي وقت من نفس الصفحة.
This needs "Allow all the time" location access, which uses a bit more battery — you can turn it off any time from the same page.

10 الحسّاسات والإشعاراتSensors & alerts

يدعم كوش سمارت حسّاسات الحرارة والرطوبة (DHT)، والأبواب/الحركة، والحسّاسات اللاسلكية 433MHz.

KUSH SMART supports temperature & humidity (DHT), door / motion, and 433MHz wireless sensors.

  1. يظهر الحسّاس تلقائيًا مع قراءته في التطبيق. اضغط عليه لفتح صفحة تفاصيله (الحالة الحيّة + الإعدادات + إعادة التسمية).
  2. حسّاس الحرارة والرطوبة (DHT): يمكنك تحديد نوعه DHT11 أو DHT22 أثناء إعداد البوردة — راجع دليل الإعداد.
  3. لتصلك الإشعارات: افتح الحسّاس ← الأتمتة ← فعّل «إرسال إشعار عند وقوع حدث».
  4. تأكّد من تفعيل إشعارات التطبيق من إعدادات الهاتف.
  1. A sensor appears automatically with its reading. Tap it to open its detail page (live status + settings + rename).
  2. Temperature & humidity (DHT): you can choose the type DHT11 or DHT22 during board setup — see the setup guide.
  3. To get alerts: open the sensor → Automation → enable “Send a notification on an event.”
  4. Make sure app notifications are enabled in your phone's settings.
🔔
تصلك الإشعارات حتى والتطبيق مغلق.
Alerts reach you even when the app is closed.

11 التحكّم اللاسلكي 433MHz و IR (الأشعّة)433MHz & IR (infrared) remotes

  1. افتح صفحة أجهزة التحكّم.
  2. اضغط «تعلّم زرًّا جديدًا»، واختر الجهاز الذي سيتحكّم فيه الزر (والإجراء: تشغيل/إطفاء/تبديل، أو إشعار للحسّاسات).
  3. اضغط الزر على جهاز التحكّم — وستتعلّم الوحدة الرمز.
  4. وبذلك يتحكّم الزر في الجهاز الذي اخترته.
  1. Open the Remotes page.
  2. Tap “Learn a new button” and pick the device it controls (and the action: on / off / toggle, or an alert for sensors).
  3. Press the button on your remote — the unit learns the code.
  4. That button now controls the device you chose.
📡
يمكنك أيضًا ربط حسّاسات 433MHz لاسلكية بإشعارات أو أتمتة بدلًا من التحكّم في مفتاح.
You can also link 433MHz wireless sensors to alerts or automations instead of controlling a switch.
🔗
أي زرّ اتعلّمته هنا يظهر كخيار «أمر ريموت (IR)» عند اختيار نتيجة أتمتة — يعني قاعدة زي «عند الغروب» أو «لما ترتفع الحرارة» تقدر تُطلق زرّ من الريموت نفسه، مش بس تشغّل/تطفي مفتاحًا. راجع الأتمتة.
Any button you learn here shows up as an “IR command” option when picking an automation's result — so a rule like "at sunset" or "when it gets hot" can fire a remote's own button, not just switch a relay on/off. See Automations.

12 المفاتيح المخفيّةHidden switches

مفاتيح محميّة بكلمة سرّ — لا تظهر إلا بعد إدخال الرمز، لمزيد من الخصوصية والأمان.

Password-protected switches — they only appear after you enter the code, for extra privacy and security.

  1. افتح صفحة المفاتيح المخفيّة وحدّد كلمة سرّ.
  2. اختر المفاتيح التي تريد إخفاءها.
  3. والآن لن تظهر إلا عند إدخال الرمز.
  1. Open the Hidden switches page and set a password.
  2. Pick the switches you want to hide.
  3. They now only show once you enter the code.

قفل مفتاح واحد برمز (PIN)

Lock a single switch with a PIN

يمكنك أيضًا حماية مفتاح بعينه برمز، فلا يعمل إلا بعد إدخاله — مفيد لمفاتيح حسّاسة كسخّان المياه أو البوابة.

You can also protect a specific switch with a PIN, so it won't work until you enter it — handy for sensitive switches like a water heater or gate.

  1. اضغط مطوّلًا على الجهاز ← تعديل (نفس مكان تغيير الاسم والأيقونة).
  2. اختر رمز الحماية (PIN) وحدّد رمزًا للمفتاح.
  3. بعدها يطلب التطبيق الرمز قبل تشغيل هذا المفتاح.
  1. Long-press the device → Edit (the same place you change the name and icon).
  2. Choose PIN protection and set a code for the switch.
  3. The app then asks for the code before turning that switch on.

13 تحديث الأجهزة لاسلكيًا (OTA)Over-the-air updates (OTA)

تُحدّث أجهزة كوش سمارت نفسها لاسلكيًا — دون فكّها أو توصيلها بالكمبيوتر. التطبيق يفحص أحدث إصدار منشور ويقارنه برقم إصدار الجهاز، ولا يُرسل التحديث إلا عندما تطلبه أنت.

KUSH SMART devices update themselves wirelessly — no dismantling, no plugging into a computer. The app checks the latest published version against the device's version, and only sends the update when you ask.

  1. اضغط مطوّلًا على الجهاز لفتح معلومات الجهاز.
  2. في بند «الإصدار» اضغط «فحص التحديث» — فإن توفّر أحدث ظهر زر «تحديث».
  3. اضغط «تحديث» — وتظهر نافذة تُبيّن النسبة المئوية للتقدّم وكم تبقّى لحظةً بلحظة.
  4. عند اكتمال 100% يُعيد الجهاز تشغيل نفسه على الإصدار الجديد ويعود متّصلًا تلقائيًا.
  1. Long-press the device to open Device info.
  2. Under “Firmware” tap “Check for update” — if a newer one exists, an Update button appears.
  3. Tap Update — a dialog shows the percentage and how much is left, live.
  4. At 100% the device reboots into the new version and comes back online on its own.
🔌
لا تفصل الكهرباء عن الجهاز أثناء التحديث. إعداداتك وبيانات الواي فاي والتراخيص كلّها محفوظة — يُستبدل البرنامج فقط.
Don't cut power to the device during an update. Your settings, Wi-Fi and licences are all kept — only the program is replaced.
📥
تجد أحدث إصدار منشور لكل بوردة في صفحة التحميل. النُّسخ يرفعها فريق كوش سمارت من لوحة التحكّم.
You'll find the latest published version for each board on the Download page. Versions are published by the KUSH SMART team from the console.

اللغة والمظهرLanguage & appearance

غيّر لغة التطبيق ومظهره في أي وقت من صفحة حسابي — ويُطبَّق فورًا على كل الشاشات دون فقدان الاتصال بأجهزتك.

Change the app's language and theme any time from the Account page — it applies instantly across every screen without dropping the connection to your devices.

  1. افتح تبويب حسابي (أسفل الشاشة).
  2. اللغة: بدّل بين العربية وEnglish — تتحوّل الواجهة كاملةً بما فيها اتجاه الكتابة.
  3. المظهر: اختر فاتح أو داكن أو حسب النظام (يتبع إعداد هاتفك تلقائيًا).
  1. Open the Account tab (bottom of the screen).
  2. Language: switch between العربية and English — the whole interface flips, including text direction.
  3. Theme: choose Light, Dark, or Follow system (matches your phone automatically).
👤
من حسابي أيضًا تجد بياناتك، وبريد الدعم، وتسجيل الخروج، وحذف الحساب.
The Account page is also where you find your details, the support email, sign-out and account deletion.

? حلّ المشكلاتTroubleshooting

يظهر الجهاز «غير متّصل»؟

تأكّد من وصول الكهرباء وعمل الواي فاي، ومن جودة الإشارة في مكان الجهاز. جرّب إيقاف الراوتر وتشغيله والانتظار دقيقة.

جهاز جديد لا يظهر؟

تأكّد من إتمام خطوات الإضافة ومن اتصال الوحدة بالواي فاي. أغلق التطبيق وأعد فتحه.

المفاتيح الخارجية لا تعمل بشكل صحيح؟

من الإعدادات العامة غيّر وضع المفتاح أو نوع التوصيل (Pull-up/Pull-down)، وإذا كان الريليه معكوسًا غيّر Active-High/Low.

الجهاز يستجيب ببطء؟

داخل المنزل يكون التحكّم محليًا وفوريًا. إذا كان بطيئًا، تأكّد من أن هاتفك على شبكة الواي فاي نفسها الخاصة بالأجهزة.

لا تصلني الإشعارات؟

تأكّد من تفعيل إذن الإشعارات للتطبيق من إعدادات الهاتف، ومن تسجيل الدخول. تصلك الإشعارات حتى والتطبيق مغلق. راجع الحسّاسات والإشعارات.

التحكّم الصوتي لا يعمل؟

امنح التطبيق إذن الميكروفون، وانطق اسم الجهاز كما هو مكتوب في التطبيق. تحقّق أيضًا من وجود خدمة تعرّف صوتي على هاتفك.

لم يظهر التحديث الجديد للجهاز؟

اضغط مطوّلًا على الجهاز ← «فحص التحديث». راجع تحديث الأجهزة لاسلكيًا.

الجيوفنسنج مش عارف يحدد موقعي الحالي؟

جرّب برّه أو قرب شبّاك مفتوح — الموقع بيعتمد على GPS الهاتف، وممكن ياخد لحظات لو الإشارة ضعيفة (جوّه مبنى كبير مثلًا). تأكّد كمان إن إذن الموقع للتطبيق ممنوح، وإن خدمة الموقع مفعّلة في إعدادات الهاتف نفسه.

نسيت كلمة المرور؟

من شاشة الدخول اضغط «نسيت كلمة المرور» واتبع الخطوات الواردة في بريدك.

A device shows “offline”?

Check it has power and Wi-Fi, and that the signal is good where it's installed. Try turning your router off and on and waiting a minute.

A new device won't appear?

Make sure you finished the add steps and the unit connected to Wi-Fi. Close the app and reopen it.

External switches don't behave right?

In General settings, change the switch mode or the wiring type (pull-up / pull-down); if a relay is inverted, flip Active-high / low.

The device responds slowly?

At home, control is local and instant. If it's slow, make sure your phone is on the same Wi-Fi network as the devices.

I'm not getting notifications?

Make sure the app's notification permission is on in your phone settings, and that you're signed in. Alerts arrive even when the app is closed. See Sensors & alerts.

Voice control isn't working?

Grant the app microphone permission, and say the device name exactly as written in the app. Also check your phone has a speech-recognition service.

A new update isn't showing?

Long-press the device → “Check for update”. See Over-the-air updates.

Geofencing can't determine my current location?

Try stepping outside or near an open window — location relies on the phone's GPS and can take a moment with a weak signal (e.g. deep inside a large building). Also check the app's location permission is granted and that location services are turned on in your phone's own settings.

Forgot your password?

On the sign-in screen tap “Forgot password” and follow the steps in your email.

تحتاج مزيدًا من المساعدة؟Need more help? تواصل مع الدعم الفني ومعك اسم/سيريال الوحدة (من صفحة تفاصيل الجهاز).Contact support with the unit's name / serial (from the device details page).
تحميل التطبيقGet the app